
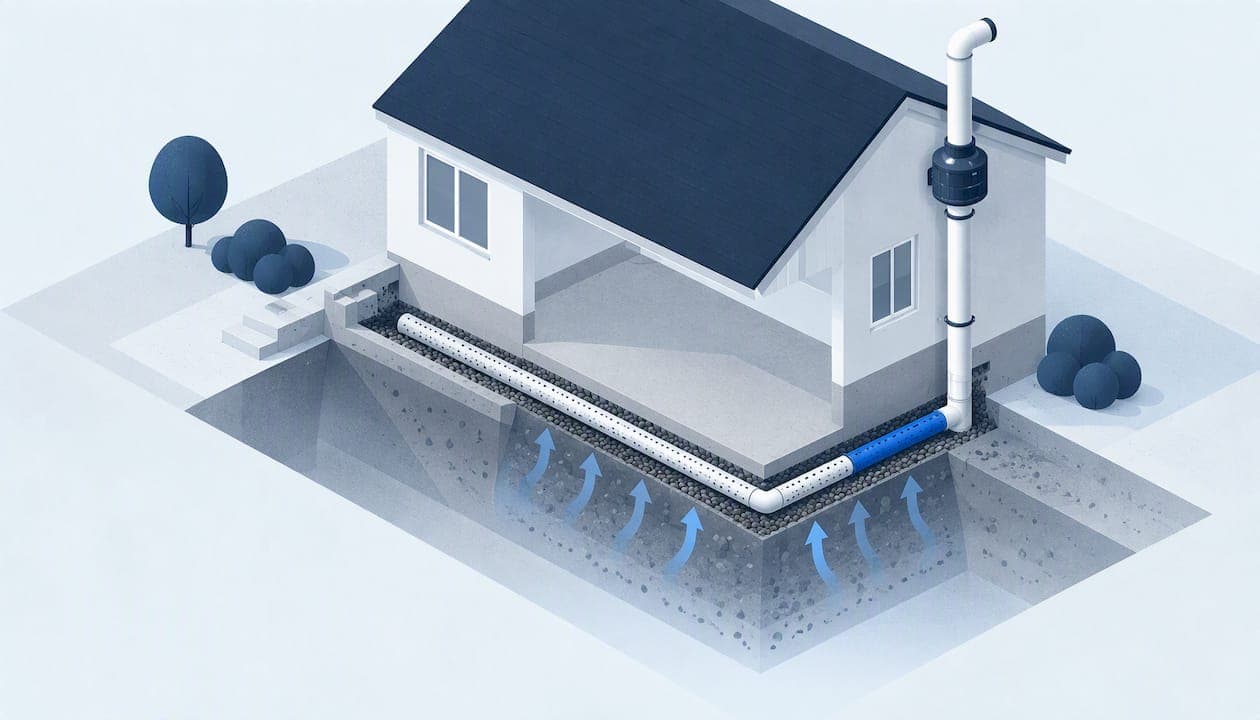
Drain tile depressurization uses your perimeter drains or sump to draw soil gas out from beneath the foundation, and it can substantially lower indoor radon once the system establishes a proper pressure field underneath the slab. A diagnostic visit and post-install verification testing confirm whether that pressure field actually formed. The EPA's technical guidance on active soil depressurization describes diagnostic procedures and system design.
TL;DR:
- A remote tap often reduces suction loss and spreads vacuum more evenly than a sump connection, especially when the sump cover cannot seal airtight.
- DTD works best with an intact, connected perimeter drain network; fragmented sections may require multiple suction points or a separate subslab system.
- Homes testing at or above 4 pCi/L should be mitigated, and postinstallation testing on the lowest livable level confirms actual system performance.
- Winter testing often captures higher radon readings because homes stay sealed for heating, so a summer result may understate seasonal exposure.
- Historical EPA estimates put active soil depressurization installation costs at $800 to $1,500, but request a written quote that includes verification testing.
Table of Contents
- How drain tile depressurization works
- Connection options: suction at the sump vs. remote taps
- Design considerations: fans, suction points, piping, and sealing
- Expected effectiveness and how professionals verify results
- When DTD is the right fit, and the diagnostics that confirm it
- Typical cost and timeline for installation
- Why site-specific design and verification testing matter
- How we design, install, and verify your radon mitigation system
- FAQ
- Sources
How drain tile depressurization works
Drain tile depressurization, often shortened to DTD, is a version of active soil depressurization that draws suction on the perimeter drain pipes running around or under your foundation instead of drilling a dedicated hole through the slab. Those drains, whether tied to a sump pit or routed to daylight, already form a network under the house. A fan connected to that network pulls air through the gravel and soil beneath the slab, creating negative pressure that keeps radon-carrying soil gas from migrating indoors.
A key factor in performance is pressure field extension. For DTD to work, the vacuum created at the suction point needs to extend beneath the slab. EPA guidance on active soil depressurization treats this spread of suction as the core measure of whether a system will actually cut radon levels, not just move air through one pipe.
The airflow path is straightforward:
- Soil gas collects in the permeable fill and gravel surrounding the drain tile.
- The drain tile network carries that gas toward the suction point.
- A fan pulls the gas through a vertical pipe and exhausts it above the roofline, away from windows and living space.
An EPA study found that active soil depressurization systems can affect building moisture and ventilation, though the effects can vary by home. The Exploratory Study of Basement Moisture examined these systems.
Connection options: suction at the sump vs. remote taps
Mitigators typically choose between two connection strategies, and the choice affects how well the pressure field spreads.
Connecting at the sump pit is one option because it uses an opening that already exists. The fan's suction pipe passes through an airtight sump cover, and the pit itself becomes the access point to the drain tile loop. The catch is that the cover has to seal completely. Any gap lets the system pull basement air instead of soil gas, which weakens suction at the far end of the loop.

A remote tap inserts the suction pipe directly into the drain tile line at a point away from the sump, bypassing the cover-sealing problem entirely. Extension guidance from the University of Missouri notes that a remote connection often reduces suction loss and helps the vacuum spread more evenly through the tile network toward the foundation's far corners.
A mitigator weighing the two will look at:
- How accessible the sump pit or drain tile is without major excavation.
- Whether the existing sump cover can be sealed airtight.
- Constraints from a finished basement, including flooring and framing near the tile line.
- Whether the house needs more than one suction point to cover the full footprint.
Pro Tip: Ask your mitigator whether a remote tap is feasible before accepting a sump-only design, especially if your sump cover is older or was not built for an airtight seal.
Design considerations: fans, suction points, piping, and sealing
A reliable DTD system depends on several design choices working together, not just the fan.
Fan selection balances suction strength against airflow volume. EPA technical documentation covers both inline and centrifugal fan types, and the right choice depends on how much resistance the drain tile network presents. Too little suction and the pressure field never reaches the far side of the house.
Some houses, particularly larger footprints or those with disconnected drain tile segments, need more than one suction point to achieve full coverage. Placement matters as much as count: a point near a weak section of drainage does more good than a second point near one that already communicates well.
Pipe diameter and routing also affect performance:
- Wider suction pipes reduce friction loss over longer runs.
- Interior routing is often cleaner but competes with finished space; exterior routing avoids that but exposes pipe to weather.
- Sharp bends and long horizontal runs both reduce effective suction at the pressure field.
Sealing finishes the job. Cracks in the slab, the slab-to-wall joint, and any untrapped floor drains all need attention, since unsealed openings leak indoor air into the suction path and rob the system of vacuum. Exhaust piping has to vent above the roofline, away from windows, to keep discharged soil gas from re-entering the house.
Pro Tip: Ask your mitigator how you can tell whether the system is operating properly and what maintenance checks are appropriate.
Expected effectiveness and how professionals verify results
Monitored systems in EPA-referenced research have shown substantial radon reductions when the pressure field extends properly under the slab, according to the Exploratory Study of Basement Moisture, which tracked inline fans connected to perimeter piping in occupied houses. The result depends heavily on soil permeability, foundation type, and how thoroughly the slab was sealed, so no two houses perform identically.
Verification is what turns a design into a confirmed result. After installation, a professional runs a radon test in the lowest livable level, often alongside diagnostic checks such as a visual survey of the drain tile connections and measurements confirming the vacuum actually reached distant corners of the foundation.
Any home testing at or above 4 pCi/L should be mitigated, a threshold the EPA has stated as the action level for radon in homes.
Timing matters for the test itself. Radon levels tend to run highest during the colder months when homes are sealed tight for heating, which is why the EPA has recommended winter as a strong window for both initial testing and post-install verification.
- Verification testing confirms the system's actual effect, not just that the fan is running.
- Seasonal timing affects readings, so a single summer test can understate winter exposure.
- Soil type, foundation construction, and sealing quality all shift the final result from house to house.
When DTD is the right fit, and the diagnostics that confirm it
DTD tends to work best in houses with functional perimeter drains or a sump already in place, permeable fill under the slab, and block foundation walls with open cores that let suction travel along the wall cavity. Good communication through the drain tile network is the deciding factor, more so than the home's size or age.
Before recommending DTD, a mitigator typically runs a few diagnostic steps:
- A visual survey of the drain tile and sump to confirm the network is intact and connected.
- Sub-slab grab sampling or sniffing to check soil gas conditions at different points.
- Suction-field extension checks, confirming vacuum reaches the far walls and corners.
- A blower-door or tracer-gas test in trickier houses where airflow paths aren't obvious.
When the drain tile is fragmented, disconnected in sections, or absent altogether, DTD alone usually won't achieve full coverage, and a mitigator will likely combine it with a separate sub-slab suction point or choose a different active soil depressurization layout entirely.
Typical cost and timeline for installation
Historical EPA-referenced estimates put active soil depressurization installation costs in the $800 to $1,500 range, though current pricing depends on site-specific factors, and our current cost guide reflects more recent figures for the Cincinnati market.
Several factors push a quote up or down:
- How much slab and perimeter sealing the house needs.
- The number of suction points required for full coverage.
- Repair and patching in finished basement areas.
- Fan type and the length and routing of suction piping.
A typical project includes a diagnostic visit, installation, and post-install verification testing. The schedule depends on the work required. Ask for a written quote that explicitly includes verification testing, not just the installation itself.
Why site-specific design and verification testing matter
Every foundation communicates differently with its drain tile, so a design that works next door may fail here. We believe post-install verification testing isn't optional. It's the only way to confirm a pressure field actually formed, and it gives homeowners and real estate transactions a documented result to rely on, not just an assumption that the fan is working.
— Yoshua
How we design, install, and verify your radon mitigation system
We build every mitigation system around your specific foundation, whether that means a drain tile connection, a sub-slab point, or a combination, and we back every installation with post-install verification testing so you have documented proof it worked.

- Radon testing to confirm whether mitigation is needed in the first place.
- Custom-designed mitigation systems matched to your foundation type and drain tile condition.
- Verification testing included after every installation.
- Repair and fan replacement for systems that are underperforming or aging out.
If your drains run to daylight rather than a sump, understanding how that drainage was built matters too, and homeowners researching perimeter drainage options can get useful background on how drainage systems are designed around a foundation. Schedule a diagnostic walk-through with us to get a written quote that includes verification testing from the start.
This article is general information, not a substitute for advice from a qualified doctor. Consult a qualified healthcare professional about your own circumstances before acting on anything here.
FAQ
In what month is radon highest?
Radon levels tend to peak during the colder months, roughly late autumn through winter, when homes stay sealed tight for heating. The EPA has recommended winter testing because it captures these higher seasonal readings.
How much is sub-slab depressurization?
Historical EPA-referenced estimates for active soil depressurization installations, which include sub-slab designs, fall in the $800 to $1,500 range, though actual pricing depends on sealing needs and system complexity at your specific property. A written quote from a mitigator reflects your foundation's actual requirements rather than a generic estimate.
Do drain tiles really work?
Yes, when the drain tile network communicates well across the foundation and the suction reaches under the full slab, monitored systems in EPA-referenced research have shown substantial radon reductions. Performance depends on soil conditions, sealing quality, and whether the pressure field actually extends to every corner, which is why post-install verification testing matters.
Is radon risk overblown?
Radon is a real health concern, and the EPA's guidance sets 4 pCi/L as the action level above which a home should be mitigated. Testing is the only way to know your home's actual level, since radon is colorless and odorless and varies significantly between neighboring properties.